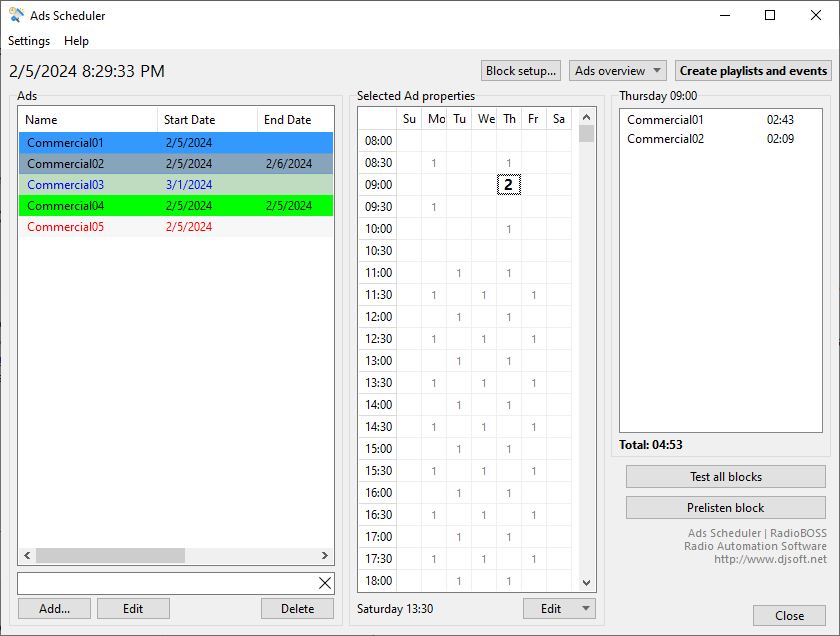
You can use the Ad Scheduler to manage advertisements, that is, to automatically create and schedule advertisement blocks.
To launch it, click Tools -> Ads Scheduler
How to use
First-time setup:
1) On the first launch, open the Settings window. (The application will prompt you to do that, just click Yes.)
2) Set the working folder for saving generated playlists and events.
3) On the Ad blocks tab, select the hours and minutes for placing ads. (You can change this setting later.)
4) Click OK.
Operation:
•In the main window, click the Add button to add tracks. The tracks will appear in the list. You can also drag the files from Windows folders to the application window, in this case, each file will be added as a separate entry. Ads are edited in the Ads Parameters window.
•To add a track to a block, put a check mark in the corresponding grid cell by right-clicking or double-clicking it, or pressing the space bar. A number will appear that indicated number of ads in the block.
•After filling the grid for each track, click the Create playlists and events button. Playlist files for each ad block and scheduler events to start those playlists at specified times will be created. Events can be automatically added to the RadioBOSS Scheduler.
•Important! For Start and End settings to work, you must set up an automatic advertisement playlist and events update.
•Multiple profiles can be used for different sets of the advertisements (commercial, social, political, etc, each with own settings of intro/outro, blocks and other options).
The color of ads in the list indicates their status:
Black – normal state;
Red – the track was not found on the disk;
Gray – the track finished running on the specified date;
Blue – running the track has been planned for a future date;
Light-gray – the track is disabled.

When you select a cell in a gird, on the right it will display the ads for the selected block. Ads of the same type following each other will be marked in bold.
You can save and load grid presets to re-use the same grid for new tracks. To do it, click the Edit button below the “Selected Ad properties” grid.
You can access the media plan, that is, view all ad blocks or selected ones only. To do it, click the Ads overview button and select the necessary view mode.
You can set the length of ad blocks as desired. Click “Block setup...” –> “Sweepers...”.
The Test All Blocks button allows you to check all blocks. The following parameters are checked: whether there are 2 or more clips of the same type in a row, whether a block exceeds the maximum duration (specified in settings).
When using multiple profiles, the Create playlists and events button, as well as adsupdate scheduler command will create playlists and events for all profiles.