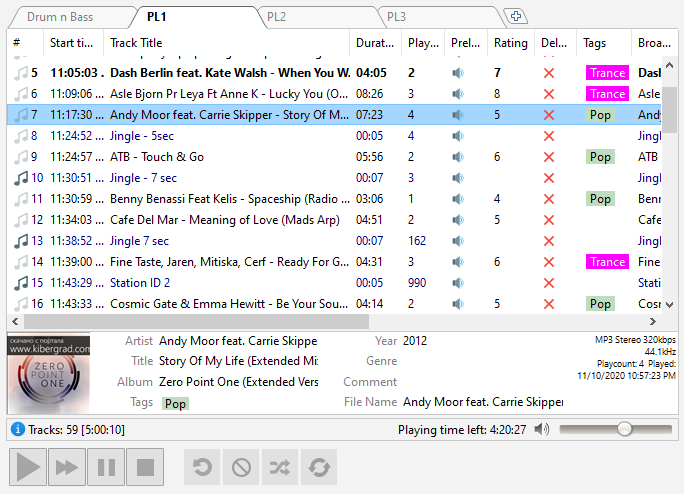
The Playlist window lists all of the tracks in the current playlist along with the track information.
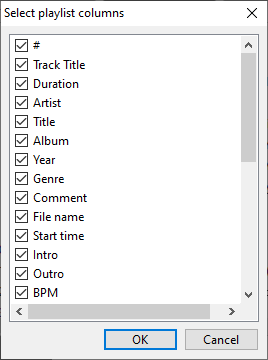
Playlist columns are configurable from the menu: View -> Playlist columns (alternatively, you can right-click a column header).
You can perform different actions with tracks by clicking the corresponding icon in the playlist:
|
Prelisten a track |
|
Remove a track |
|
Play a track |
|
Add a Stop command after a track |
The Listeners column shows the current number of listeners and changes from the previous track.
By default, there are two playlist tabs. You can create as many playlists as you need, just click the "+" button on the right.
Right-click on a playlist tab to rename, delete it, or set additional options:
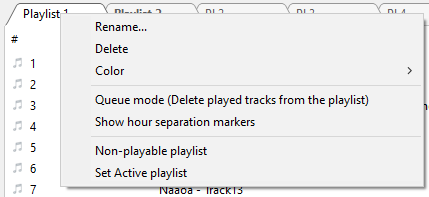
Queue mode – when enabled, tracks are deleted from the playlist after playback. The tracks will not be deleted if either Repeat Track or Repeat List options are enabled.
Show hour separation markers – enable automatic hour markers.
If you would like to make a playlist non-playable, right-click its tab and check the Non-playable playlist option.
Set Active playlist – marks the playlist as active. Scheduled events are inserted into the active playlist.
Icons
Tracks in the playlist are marked with a blue note icon. Tracks that have already been played have a grayed-out icon. Scheduled tracks, in addition, have the small "clock" icon. Icons for specific states (playing, next track) can be configured in Style. Also, File Types can have their own icons assigned.
Various file types (commercials, station IDs, jingles, ...) can be marked with color.
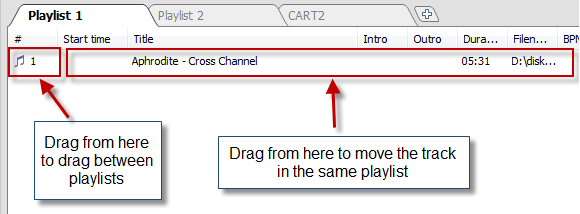
You can drag files inside a playlist using a mouse or using keyboard: Ctrl+Down arrow, Ctrl+Up arrow. You can drag files between different playlists (eg, to an AUX playlist).
You can add tracks to the playback queue. Just right-click on a track and select Add to playback queue. The track's number in the queue will be displayed next to the track.
Below the playlist, there is an area for information about tracks. You can editing tags in that area.
To prelisten a track: hold down Alt and click on the track.
Middle-click an icon in the Icon column to switch between two modes: show only one icon (the state icon, if applicable, or the track icon), or show two icons: the track icon and the track state icon. The state icon indicates the track state: playing, next, or played. State icons can be configured in Styles.
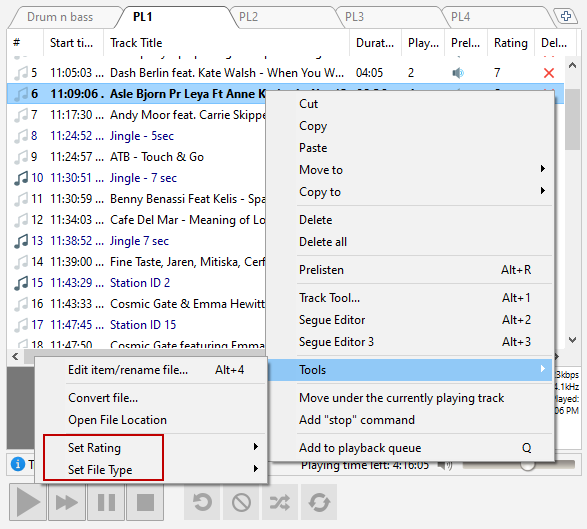
You can set a rating and a file type for each track. To do it, right-click the playlist and select the “Tools” item. Rating can also be set using a hot key: Ctrl+Shift+Number (0-9)
You can also set a file type via the music library: select one or more tracks, right-click a track in the music database, and select “Track Properties...”
A cover art for the selected track is shown in the information area. For tracks without pictures, you can put an image file named nocover.png into the settings folder: this picture will be shown in the Track information field for tracks without cover art. To open the settings folder, select Settings –> Open Settings folder in the menu.
More information: